

Introduction:
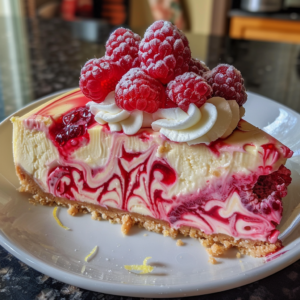
Raspberry Ripple Cheesecake Slice is a divine dessert that combines the rich creaminess of cheesecake with the tartness of raspberries, all atop a buttery biscuit base. This decadent treat is perfect for any occasion, from elegant dinner parties to casual gatherings with friends. In this article, we’ll explore the irresistible allure of Raspberry Ripple Cheesecake Slice, share a delectable recipe, and offer tips on optimizing it for search engines.
Ingredients:
- 1 1/2 cups graham cracker crumbs
- 1/4 cup melted unsalted butter
- 2 tablespoons granulated sugar
- 16 oz cream cheese, softened
- 3/4 cup granulated sugar
- 2 large eggs
- 1 tablespoon lemon zest
- 1 teaspoon vanilla extract
- 1/2 cup sour cream
- 1 cup raspberries, fresh or frozen
- 3 tablespoons raspberry jam
- Whipped cream, for garnish
- Additional raspberries, for garnish
- Lemon peel twists, for garnish
Instructions:
- Preheat your oven to 325°F (165°C).
- For the base, mix graham cracker crumbs, melted butter, and 2 tablespoons sugar. Press the mixture into the bottom of a 9-inch springform pan and chill it for 20 minutes.
- In a bowl, beat the cream cheese with 3/4 cup sugar until it’s smooth. Add the eggs one at a time, then mix in the lemon zest and vanilla extract. Fold in the sour cream.
- For layering, pour half of the filling over the crust. Dollop and swirl half of the raspberry jam over the filling. Repeat this with the remaining filling and jam. Finally, top it off with raspberries.
- Bake the cheesecake for 45-55 minutes. You’ll know it’s done when the edges are set, but the center is still slightly jiggly.
- Allow the cheesecake to cool to room temperature, then refrigerate it for at least 4 hours.
- Before serving, garnish your masterpiece with whipped cream, additional raspberries, and lemon twists.
Prep Time: 20 minutes | Cooking Time: 55 minutes | Chill Time: 4 hours | Total Time: 5 hours 15 minutes Calories: 420 kcal | Servings: 10 servings
Serving Tips:
- Chilled Delight: Raspberry Ripple Cheesecake Slice is best served chilled, straight from the refrigerator. This allows the cheesecake to set properly and ensures a firm texture with creamy consistency.
- Garnish with Fresh Berries: Before serving, garnish each slice with a few fresh raspberries and mint leaves for a pop of color and a burst of freshness. This enhances the presentation and adds an extra layer of flavor.
- Accompaniments: Serve Raspberry Ripple Cheesecake Slice with a dollop of whipped cream or a drizzle of raspberry sauce for an extra indulgent touch. Fresh berries or a sprinkle of powdered sugar can also complement the dessert beautifully.
- Portion Control: When slicing the cheesecake, use a sharp knife dipped in hot water for clean cuts. Wipe the knife between slices to ensure neat servings and prevent the raspberry swirl from smudging.
Storage Tips:
- Refrigeration: Store any leftover Raspberry Ripple Cheesecake Slice in an airtight container or cover the baking tin tightly with plastic wrap. Refrigerate for up to 3-4 days to maintain freshness and prevent the cheesecake from drying out.
- Freezing: Raspberry Ripple Cheesecake Slice can be frozen for longer storage. Wrap individual slices or the entire cheesecake tightly in plastic wrap and aluminum foil to prevent freezer burn. Label with the date and freeze for up to 1-2 months.
- Thawing: To thaw frozen Raspberry Ripple Cheesecake Slice, transfer it from the freezer to the refrigerator and let it thaw overnight. Alternatively, thaw individual slices at room temperature for 30-60 minutes before serving.
- Serve Chilled: After thawing, Raspberry Ripple Cheesecake Slice should be served chilled for the best texture and flavor. Return any leftovers to the refrigerator promptly to maintain freshness.
FAQs:
1. Can I Use Frozen Raspberries Instead of Fresh in Raspberry Ripple Cheesecake Slice? Yes, you can use frozen raspberries in this recipe. Thaw them before pureeing and straining to remove excess moisture. Keep in mind that frozen raspberries may yield a slightly different texture and flavor compared to fresh ones.
2. Can I Substitute Cream Cheese with Greek Yogurt for a Lighter Version? While Greek yogurt can be used as a lighter alternative to cream cheese, it will alter the texture and flavor of the cheesecake. The cheesecake may be less creamy and tangier with Greek yogurt. For best results, use full-fat Greek yogurt and adjust the sweetness to your preference.
3. Can I Make Raspberry Ripple Cheesecake Slice Without a Biscuit Base? Yes, if you prefer a crustless version, you can omit the biscuit base. Simply pour the cheesecake mixture into the baking tin without the crust and swirl in the raspberry puree as directed. Keep in mind that the texture and flavor will differ without the biscuit base.
4. How Far in Advance Can I Prepare Raspberry Ripple Cheesecake Slice for an Event? Raspberry Ripple Cheesecake Slice can be prepared 1-2 days in advance of your event. Follow the recipe instructions, then refrigerate the cheesecake until ready to serve. This allows the flavors to meld and the cheesecake to set properly, ensuring a delicious dessert for your event.
5. Can I Double the Recipe to Make a Larger Batch of Raspberry Ripple Cheesecake Slice? Yes, you can easily double or triple the recipe to make a larger batch of Raspberry Ripple Cheesecake Slice. Simply adjust the quantities of ingredients accordingly and use a larger baking tin or multiple tins to accommodate the increased volume. Ensure even baking by rotating the tins halfway through the baking time.
Conclusion:
Raspberry Ripple Cheesecake Slice is a dessert that’s sure to impress with its heavenly combination of flavors and textures. Whether served at a special occasion or enjoyed as a sweet indulgence at home, this delightful treat is guaranteed to leave a lasting impression. So why not treat yourself and your loved ones to a batch of homemade Raspberry Ripple Cheesecake Slice today? With just a few simple ingredients and a bit of love, you can create a dessert that’s as beautiful as it is delicious.