

Introduction:
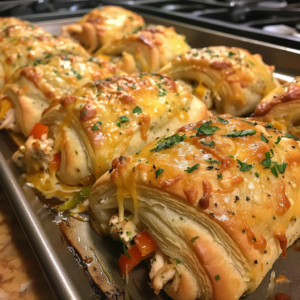
Chicken Stuffed Crescent Rolls offer a delightful blend of tender chicken, creamy cheese, and flavorful herbs wrapped in buttery crescent roll dough. This simple yet satisfying dish is perfect for weeknight dinners, casual gatherings, or as a tasty appetizer for parties. In this article, we’ll explore the savory world of Chicken Stuffed Crescent Rolls, share a mouthwatering recipe, and provide insights on optimizing it for search engines.
Ingredients:
- 1 can (8 oz) refrigerated crescent dinner rolls
- 1 cup cooked chicken, shredded or diced
- 1/2 cup shredded cheese (cheddar, mozzarella, or your choice)
- 1/4 cup cream cheese, softened
- 1/4 cup diced bell peppers (red, green, or yellow)
- 1/4 cup diced onion
- 1 teaspoon garlic powder
- 1 teaspoon dried parsley
- Salt and pepper to taste
- Optional: paprika, chili powder, or cayenne pepper for extra flavor
Directions:
- Preheat Oven and Prepare Pan: Set oven to 375°F (190°C). Line a baking sheet with parchment or grease lightly.
- Mix Filling: In a bowl, combine chicken, cheeses, bell peppers, onion, garlic powder, parsley, and any optional seasonings. Mix until well combined.
- Prepare Dough: Unroll crescent dough and separate into triangles. Place a spoonful of filling on the wide end of each triangle.
- Roll and Arrange: Roll up the dough starting from the filled end, enclosing the filling. Place rolls on the baking sheet.
- Bake: Bake for 10-12 minutes or until golden brown. Optional: Brush with melted butter and sprinkle extra cheese or herbs before baking.
- Serve: Let cool slightly before serving. Garnish with fresh herbs and serve with dipping sauces.
- Prep Time: 10 minutes | Cooking Time: 12 minutes | Total Time: 22 minutes | Servings: 8
Serving Tips:
- Garnish Before Serving: Before serving Chicken Stuffed Crescent Rolls, consider garnishing them with additional chopped parsley or a sprinkle of grated Parmesan cheese for an extra pop of flavor and visual appeal.
- Accompaniments: Serve Chicken Stuffed Crescent Rolls alongside a fresh green salad tossed with vinaigrette dressing for a complete and balanced meal. You can also pair them with dipping sauces such as marinara sauce, ranch dressing, or honey mustard for added flavor.
- Presentation: Arrange the Chicken Stuffed Crescent Rolls on a serving platter or board for a visually appealing presentation. You can stack them in a pyramid shape or line them up neatly for a more organized look.
- Serve Warm: Chicken Stuffed Crescent Rolls are best enjoyed warm from the oven when the crust is crisp and the filling is creamy. Serve them immediately after baking for the ultimate dining experience.
Storage Tips:
- Refrigeration: Store any leftover Chicken Stuffed Crescent Rolls in an airtight container in the refrigerator for up to 3-4 days. Make sure to allow the rolls to cool completely before transferring them to the container to prevent condensation and maintain their texture.
- Reheating: When reheating leftover Chicken Stuffed Crescent Rolls, preheat your oven to 350°F (175°C) and place the rolls on a baking sheet lined with parchment paper. Bake for 10-15 minutes, or until heated through. Avoid microwaving, as it may result in soggy crusts.
- Freezing: While it’s best to enjoy Chicken Stuffed Crescent Rolls fresh, you can freeze them for longer storage. Place the cooled rolls in a single layer on a baking sheet and freeze until firm, then transfer them to a freezer-safe container or bag. To reheat, bake frozen rolls in a preheated oven at 350°F (175°C) for 15-20 minutes, or until heated through.
- Individual Portions: To make reheating easier, consider wrapping individual Chicken Stuffed Crescent Rolls in aluminum foil before storing them in the refrigerator or freezer. This allows you to reheat only the portions you need without thawing the entire batch.
FAQs:
1. Can I Use Pre-Cooked Chicken for Chicken Stuffed Crescent Rolls? Yes, you can use pre-cooked chicken for this recipe. Simply shred or chop cooked chicken breasts, rotisserie chicken, or leftover roasted chicken and incorporate it into the filling mixture as directed.
2. Can I Make Chicken Stuffed Crescent Rolls Ahead of Time? Yes, you can assemble the Chicken Stuffed Crescent Rolls ahead of time and refrigerate them until ready to bake. Simply cover the assembled rolls tightly with plastic wrap or aluminum foil and refrigerate for up to 24 hours before baking.
3. Can I Freeze Chicken Stuffed Crescent Rolls Before Baking? Yes, you can freeze the assembled Chicken Stuffed Crescent Rolls before baking for longer-term storage. Place the assembled but unbaked rolls on a baking sheet lined with parchment paper and freeze until firm. Once frozen, transfer the rolls to a freezer-safe container or bag and store for up to 1 month. Bake from frozen, adding a few extra minutes to the baking time.
4. Can I Substitute Cream Cheese with Another Cheese in Chicken Stuffed Crescent Rolls? Yes, you can customize the filling by substituting cream cheese with another cheese of your choice, such as shredded cheddar, mozzarella, or Swiss cheese. Experiment with different cheese varieties to create unique flavor combinations.
5. Can I Make Chicken Stuffed Crescent Rolls Vegetarian? Yes, you can make vegetarian Chicken Stuffed Crescent Rolls by omitting the chicken and using a combination of sautéed vegetables instead. Consider using diced bell peppers, onions, mushrooms, spinach, or any other favorite vegetables for a delicious meat-free alternative.