

Introduction:
Experience a delightful explosion of flavor with Cherry Pie Bombs, a delectable twist on the classic cherry pie. These bite-sized treats feature a sweet cherry filling encased in a tender biscuit shell, creating a perfect balance of tartness and sweetness in every bite. In this article, we’ll explore the irresistible appeal of Cherry Pie Bombs, share a simple recipe for making them at home, and explain why they’re a must-have dessert for any occasion.
Ingredients:
- 1 can (8-count) Grand biscuits (not flaky layers or crescent roll dough)
- 1 cup cherry pie filling
- ½ cup (1 stick) unsalted butter, melted
- ½ cup cinnamon/sugar blend
Directions:
- Begin by separating the biscuits into two layers and placing them on a clean surface.
- Using a rolling pin or your hands, gently roll out each layer of the dough until it reaches approximately 4 inches in diameter, resulting in 16 circles.
- Spoon about 1 tablespoon of cherry pie filling into the center of each circle. Seal the edges by pinching them together and roll the dough into balls.
- Coat all sides of the bombs with melted butter, then generously roll them in the cinnamon sugar mixture.
- Air Fryer Instructions:
- To prepare in the air fryer, spray the air fryer basket or racks with oil to prevent sticking. Arrange the bombs in a single layer, ensuring they are spaced apart.
- Air fry at 330°F for approximately 6-7 minutes. Carefully wiggle the bombs to loosen them from the baskets.
- Continue air frying for an additional 1-2 minutes until they achieve a crispy golden brown exterior. Serve warm and enjoy the delightful flavors!
- Oven Bake Instructions:
- Preheat your oven to 375°F and line a baking sheet with parchment paper.
- Arrange the bombs on the baking sheet, leaving approximately 2 inches of space between each one.
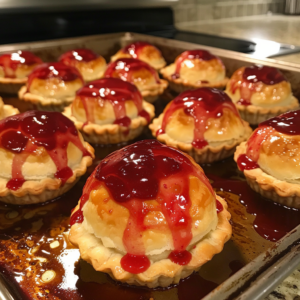
- Bake in the preheated oven for 12-15 minutes, or until they acquire a beautiful golden brown hue.
- Serve warm to experience the soft and gooey cherry filling enveloped within the crispy pastry.
Serving:
- Warm Serving: Cherry Pie Bombs are best served warm, straight from the oven, when the biscuit shell is flaky and the cherry filling is gooey. Serve them immediately for the ultimate indulgence.
- Presentation: Arrange the Cherry Pie Bombs on a serving platter or plate in a single layer, ensuring they are not overcrowded. This allows guests to easily grab a bomb without disturbing the others.
- Optional Garnish: For an extra touch of sweetness and presentation, dust the Cherry Pie Bombs with powdered sugar just before serving. This adds a beautiful finishing touch and enhances their visual appeal.
- Accompaniments: Serve Cherry Pie Bombs with a scoop of vanilla ice cream or a dollop of whipped cream for an extra indulgent treat. The creamy accompaniment complements the warm bombs perfectly and adds another layer of flavor.
Storage:
- Refrigeration: If you have leftovers, store the cooled Cherry Pie Bombs in an airtight container in the refrigerator for up to 2-3 days. To reheat, place them on a baking sheet and warm in a preheated oven at 350°F (175°C) for 5-7 minutes or until heated through.
- Freezing: Cherry Pie Bombs can be frozen for longer storage. Arrange the cooled bombs in a single layer on a baking sheet and place them in the freezer until frozen solid. Once frozen, transfer them to a freezer-safe bag or container for up to 2-3 months. To reheat, bake them directly from frozen at 350°F (175°C) for 10-12 minutes or until heated through.
- Individual Portions: If you’re reheating individual portions, you can use a toaster oven for quick reheating. Place the Cherry Pie Bombs on the toaster oven tray and toast them until warmed through and crispy.
FAQs:
- Can I Use Homemade Cherry Pie Filling for This Recipe? Absolutely! While store-bought cherry pie filling offers convenience, you can use homemade cherry pie filling for a more customized flavor. Simply prepare your favorite cherry pie filling recipe and use it as directed in the Cherry Pie Bombs recipe.
- Can I Make Cherry Pie Bombs Ahead of Time? Yes, you can prepare the Cherry Pie Bombs ahead of time and refrigerate them until ready to bake. Assemble the bombs as instructed, cover them tightly with plastic wrap, and refrigerate for up to 24 hours. Bake them just before serving for the best results.
- Can I Use Other Pie Fillings Besides Cherry? Absolutely! While cherry pie filling is classic and delicious, you can experiment with other pie fillings to create a variety of flavors. Try apple, blueberry, peach, or strawberry pie filling for unique and tasty alternatives to cherry.
- Can I Freeze Cherry Pie Bombs After Baking? Yes, Cherry Pie Bombs can be frozen after baking for longer storage. Allow the baked bombs to cool completely, then arrange them in a single layer on a baking sheet and freeze until solid. Once frozen, transfer them to a freezer-safe bag or container for up to 2-3 months. To reheat, bake them directly from frozen until warmed through.
- How Do I Prevent Cherry Pie Bombs from Leaking During Baking? To prevent the cherry filling from leaking out during baking, make sure to seal the edges of the biscuit dough tightly around the filling. Press the seams together firmly to create a secure seal, and place the bombs seam-side down on the baking sheet before baking. This helps to keep the filling contained as the bombs bake and expand.
Conclusion:
Cherry Pie Bombs are a delightful dessert that combines the classic flavors of cherry pie with the convenience of handheld treats. With their flaky biscuit exterior and juicy cherry filling, these bombs are sure to impress your family and friends. Try making Cherry Pie Bombs at home and treat yourself to a burst of sweetness in every bite!